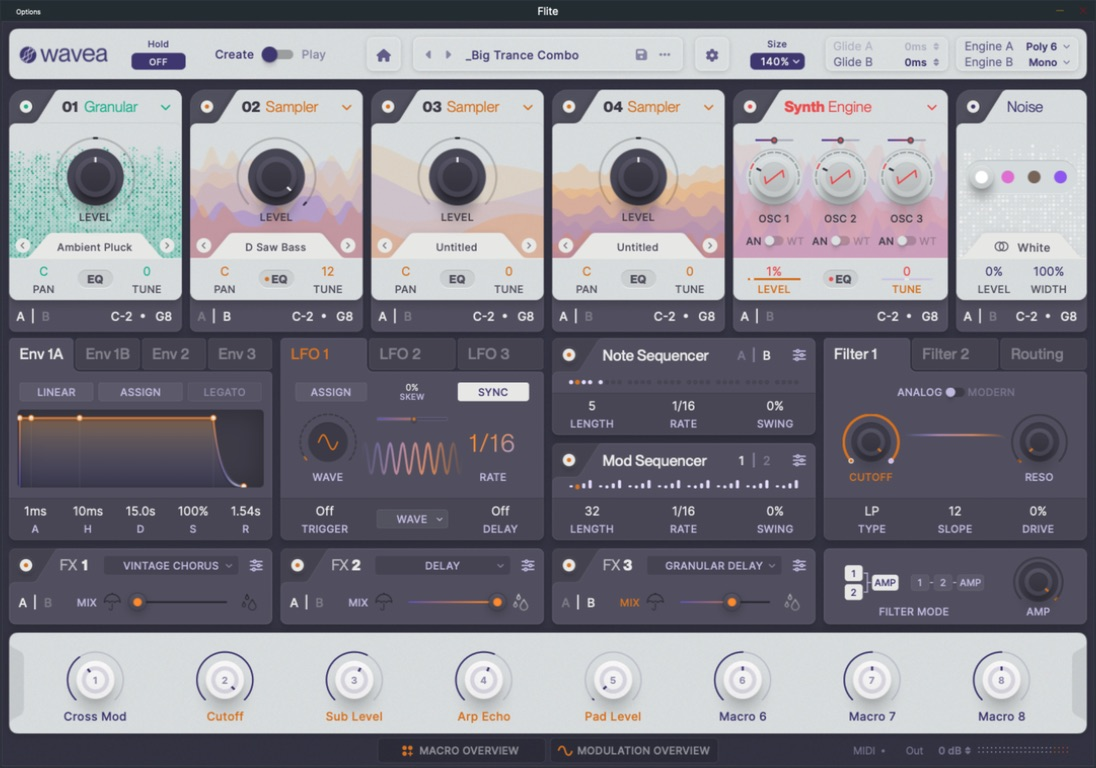
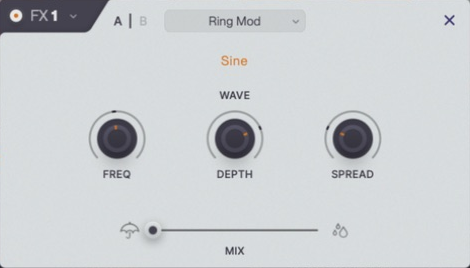
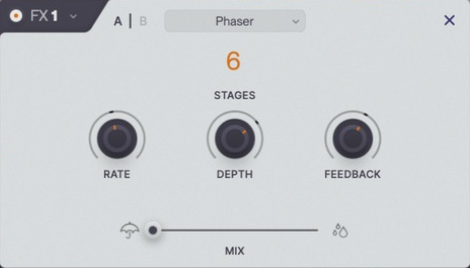
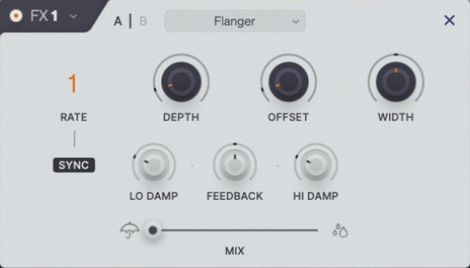
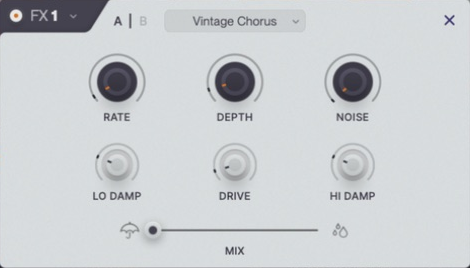
Flite combines sample playback, granular synthesis and a three-oscillator synth. Start in Play to explore a preset through its macros; switch to Create when you want to work on the individual sound sources.
The v2.1 release provides VST3 for Windows and macOS, and Audio Unit (AU) for macOS. AU is not a Windows format. Screenshots use different interface sizes for readability; the host window frame can differ.
01 Install and activate
Install
Close your DAW, run the installer for your platform, then reopen the DAW and let it scan plugins. Insert Flite on an instrument/MIDI track, not as an audio insert effect.
Sign in
Use your Wavea account email and password. A guest purchase may require you to follow the password-setup email before signing in. The provider API key used for AI generation is not your Wavea password.
Library
Follow the content setup prompt and choose a writable library location. Keep this folder available when reopening projects; the plugin and its sound library are separate.
Licence
Settings shows Full or Play. If a purchase is missing, confirm the purchase email and use Sync. Avoid purchasing again simply because the local licence has not refreshed.
02 First sound
Preset
Choose a factory preset, enable input monitoring and play a MIDI note. The footer MIDI indicator helps distinguish missing note input from an audio-output problem.
Macros
Turn a named macro gradually to hear the preset designer's intended performance range. Save a new preset when you want to keep an edited version.
Create
Select Create to access the detailed panels. Availability of editing features depends on your licence.
TRY IT IN FLITE
A first-session check
Load Flite on an instrument track and sign in.
Load a preset from the browser.
Play a note and check both MIDI and output activity.
Try a macro, then open Create to find the parameter it controls.
Navigate the instrument and control how notes reach its two voice engines.
01 Navigation
Play / Create
Choose the macro-focused performance view or the detailed sound-design interface. They are two views of the same preset, not separate copies of the sound.
Home
Return to the main Create dashboard from expanded editors and overview panels.
Preset name and arrows
Open preset selection or step through available sounds. Save before replacing a sound you have edited.
Save / preset menu
Save and manage the current preset through the header controls. A preset is the complete instrument setup, rather than just one sample slot.
Settings and Size
Open account/library preferences or adjust the interface scale. Larger sizes improve legibility without changing the audio.
02 Performance
Hold
Keeps incoming notes held for sustained sounds and sequenced patterns. Turn Hold off when a sequence appears to continue after releasing the keyboard.
Engine A / Engine B
The two engines have separate voice-mode controls. A source's A/B selector determines which engine plays it; A/B is routing, not an undo or comparison button.
Poly / Mono
Poly allows overlapping notes up to the selected voice count; Mono restricts the engine to monophonic playing. Long releases can keep voices active after keys are released.
Glide A / Glide B
Set pitch-transition time for the corresponding engine. The audible result depends on voice mode and the notes you play.
Source key range
Restrict a sound source to a region of the keyboard. Use this with engine assignment for splits and layered patches.
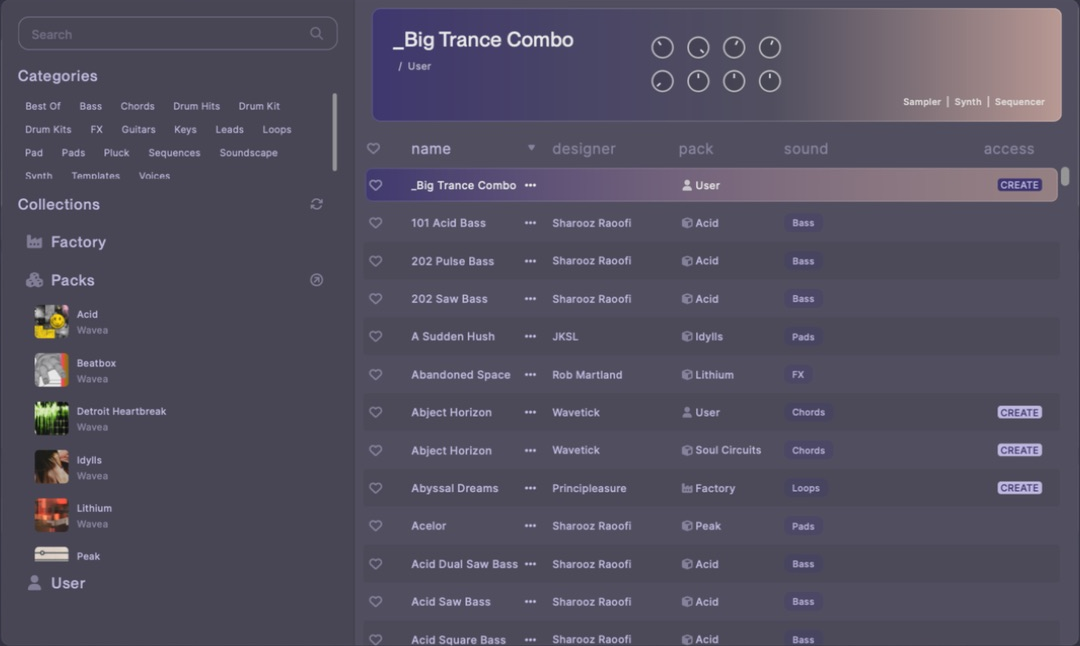
Select a sound to load its complete configuration. Use its pack/library context and category tags to narrow the list.
Search
Search the browser to find a sound by its available text metadata. Clear the search and tag filters if an installed preset appears to be missing.
Categories and tags
Filter the visible presets by sound type. These are browser organisation tools; they do not alter the synthesis engine.
Heart
Mark a favourite so you can return to it while auditioning. Favouriting is not the same as saving an edited preset.
Expansions
Installed, licensed expansion content is available through the library. A preset that uses missing audio cannot be made complete merely by saving it again.
02 Buying and installing expansions
Expansion packs add themed sounds to your library. Buying a pack adds content; it is not itself an upgrade to the Create editing licence. Purchase and installation are separate steps.
1. Choose a pack
Listen to the store demos and check the product page for contents, requirements and current prices. Expansion sounds run inside Flite, not as a separate plugin.
2. Use your Wavea email
Purchase with the email you use to sign in to Flite so the pack is linked to that account. New customers buying without an account should follow the password-setup email after purchase, then sign in with their purchase email and chosen password. Existing account holders keep their existing password.
3. Sync your licences
Save your current sound and project first. In Flite Settings, use SYNC to rescan your licences and content. Flite resets to its default state when the rescan completes. Make sure you are signed in to the account used for the purchase.
4. Download the content
Find the pack in the preset browser and click its download button. Check the minimum required Flite version and whether the factory library is required. Meet those requirements, then click DOWNLOAD with a reliable internet connection. Save unsaved progress first: Flite also resets when the download completes.
5. Play the presets
Select the installed pack in the browser, load a preset and explore its Play macros. You do not need to reinstall the plugin just to add an expansion.
Missing content?
Check your purchase email, signed-in account, completed download and library location. Clear browser search and category filters. Keep required audio installed for project recall: resaving a preset will not restore missing samples. If you purchased with the wrong email, contact info@wavea.co rather than buying again.
03 Library folders: Factory and User
Open Settings and read the path below Library: this is the active content folder. It may differ from the default if you chose another drive. In Finder or File Explorer, navigate to that folder. Library → CHANGE selects a different content location and attempts to move the existing Factory, User and Packs folders; back up your content before relocating it.
Default locations
Mac: ~/Music/Wavea/Flite (inside your home folder). Windows: Documents\Wavea\Flite, using your Windows Documents location, which may be redirected. The path shown in Settings is the authoritative location.
Factory
Factory/Presets, Factory/Instruments and Factory/Samples contain supplied library content. Treat Factory as the original library; save your own variations to User rather than editing factory files in place.
User
User/Presets contains saved complete .flite presets. User/Instruments contains your .finst sampler instruments. User/Samples contains .fsamp granular sample definitions. These last two are Flite sound definitions, not simply folders of interchangeable WAV files.
Packs
Purchased expansion content is installed beneath Packs in the same library root. Keep these files available alongside the factory content required by your presets.
Finding sounds in Flite
Use the preset browser’s Factory, User and pack filters for complete sounds. Use the Sampler instrument selector for .finst instruments and the Granular sample selector for .fsamp definitions. A saved instrument does not automatically become a complete preset.
Backups
Back up the library and any external audio used by your projects. Do not assume that saving a preset or DAW project collects every source audio file. Moving or deleting referenced content can leave a sound incomplete.
04 Play and save
Play macros
Each macro may control multiple parameters and is named by the preset designer. An unassigned macro will not change the sound.
Save a preset
Preserve your complete sound, including source settings and assignments, under a useful name. Keep an untouched copy of the original when experimenting.
Instrument files
A .finst is a sampler instrument; a .fsamp is a granular sample definition. These are not interchangeable with a complete Flite preset.
Project recall
Your DAW stores plugin state, but external content still needs to remain available. Keep user instruments and their required audio backed up with the project.
Each of the four source slots can host a Sampler or Granular instrument.
01 Source and editor
Sampler / Granular selector
Choose the slot's playback model. Sampler uses mapped sample zones; Granular builds a texture from small grains of a source sample.
Slot header / sample name
Open the instrument's editor or source selection controls. Use the editor/header controls to open settings; the large level knob is for level adjustment.
Power / mute
Silence an individual source to compare its contribution without removing its settings.
Previous / next
Step through instrument or sample choices in the corresponding library.
02 Mix and performance
Level
Balance the slot against the synth, noise and other sample slots. Drag to change level; the main level knob is not a settings toggle.
Pan
Place the source left or right in the stereo image.
Tune
Transpose the source. Detailed pitch settings include octave, coarse and fine tuning; the sample root note is a separate setting.
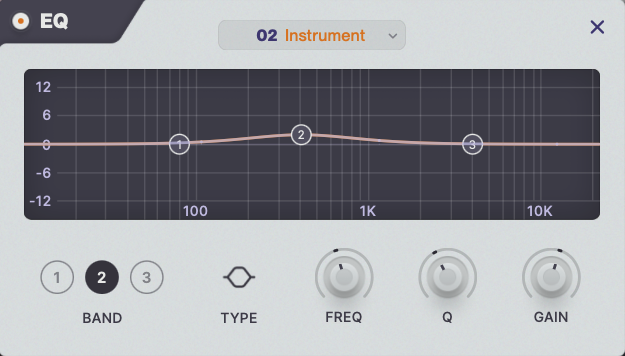
EQ
Open that source's three-band EQ. Tone-shape a layer before combining it with the other sources.
A / B and keyboard range
The strip beneath each sample slot, Synth Engine and Noise selects engine A or B and the source's lowest/highest triggering notes. It is a source-level keyboard split, not the polyphonic voice count. A source must match the playing engine and receive a note inside its range to trigger.
Low note / high note
Drag each displayed note vertically to change that boundary. Both end notes are included and the boundaries cannot cross. Double-click the low value to restore MIDI note 0, or the high value to restore MIDI note 127. Octave labels can differ between hosts; MIDI note numbers are the reliable reference.
Splits versus layers
For a split, use non-overlapping ranges, such as one source ending at B2 and another beginning at C3. For a layer, overlap their ranges. Notes in the overlap can trigger both sources if their engine assignment matches. These limits do not transpose the sound.
Source range versus sample zones
The source strip gates the whole instrument. Individual Sampler zones still have their own note and velocity ranges: a note must pass the source range and match a playable zone. Widening the source range does not create missing sample mappings. The Synth Engine strip applies to its oscillator group, not separate ranges for Osc 1, 2 and 3.
TRY IT IN FLITE
Make a two-layer patch
Load a sampler instrument in slot 1 and a contrasting source in slot 2.
Keep both on the same engine and overlapping key ranges for a layer.
Lower each level, then blend them.
Use source EQ to leave space for each part rather than simply increasing both levels.
Three oscillators, analogue and wavetable sources, and independent sound-shaping modes.
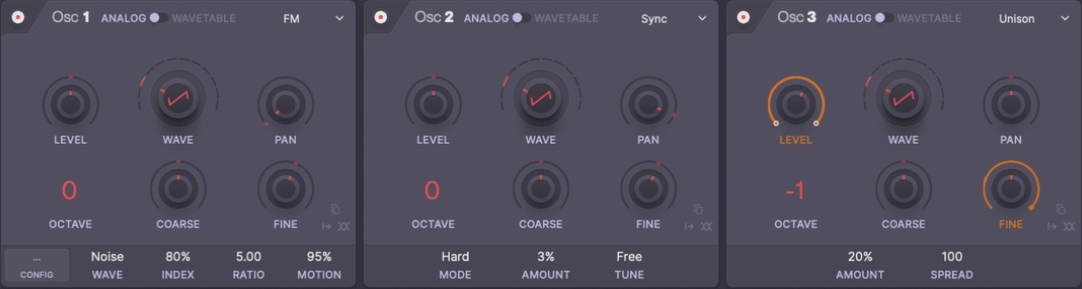
Open the Synth Engine settings to see all three oscillator panels. Main oscillator knobs distinguish a click from a drag: a click toggles settings, dragging changes the source shape, and right-click mutes. The three small level strips above them balance the oscillators.
Select Shape is an instruction to choose processing, not an additional sound-shaping algorithm. The visible controls change with the selected mode.
Oscillator settings — FM, Sync and Unison examples · Click to enlarge
01 Source and tuning
AN / WT
Choose an analogue-style waveform or wavetable source. The wave selector and its available shapes follow this choice.
Analogue wave
The source list includes Sine, Triangle, Saw, Pulse, Saw-Tri, VarPulse, 2xSaw, 7xSaw, FoldSine, Trapez, SyncSaw and Sub Stack.
Set the oscillator's contribution and stereo placement within the synth.
Octave / Coarse / Fine
Tune in octaves, semitones and small pitch offsets. Fine detuning between oscillators creates beating; large intervals create layered harmonies.
02 Shaping
Colour
Change harmonic character with the selected colour mode, amount and bias. Audition at comparable levels because extra harmonics can sound louder.
Sync
Reset the oscillator's cycle against a synchronising source. Mode and tuning change the reset relationship; moving the amount/tuning produces the characteristic hard-edged sweep.
FM
Use internal phase modulation to create FM-style sidebands. INDEX controls intensity, RATIO sets the modulator frequency relationship, and MOTION shapes how the index changes after a note starts. Open CONFIG for the additional controls below.
Exp FM
Exponential frequency modulation offers different pitch behaviour from ordinary FM. The advanced menu includes Classic, Fixed and Interval depth behaviours and starting recipes.
AM
Amplitude modulation introduces a rhythmic or metallic change depending on modulator settings. Mode and modulator wave alter its character.
Unison
Layer two detuned copies of this oscillator. AMOUNT controls their pitch separation and SPREAD their stereo placement; there is no separate Unison voice-count control. See the detailed controls below.
03 Advanced FM
Modulator wave
Sine gives a relatively simple starting spectrum; Triangle, Saw, Pulse and Noise produce different sidebands and texture.
INDEX
Set modulation intensity from 0 to 100%. Zero removes the phase modulation; increasing it creates a more complex spectrum. This is not an output-level control.
RATIO / Fine Ratio / Musical Ratios
RATIO sets modulator frequency relative to the played oscillator: 1 is equal frequency, 2 is twice the frequency and 0.5 is half. The panel range is 0.5–10 in steps of 0.5. Fine Ratio in CONFIG offsets it by hundredths, not oscillator tuning cents: +25 adds 0.25. Musical Ratios sets both values together, including subharmonic, integer and inharmonic choices such as sqrt(2), Golden and pi.
MOTION
A bipolar index envelope: zero holds the chosen index, positive values make it decay after note-on, and negative values make it rise towards the chosen index. Greater magnitude makes the movement stronger and faster. CONFIG offers Off, Fast Decay, Medium Decay, Slow Decay and Slow Rise starting points.
Feedback
Feed the modulator's previous output back into its phase to increase spectral complexity. CONFIG offers 0, 10, 25, 50, 75 and 100%. Start low for controlled harmonic changes; high values can become rough or noisy.
Velocity to Index
Choose 0, 25, 50, 75 or 100% velocity sensitivity for modulation depth. At zero, note velocity does not scale the index. At 100%, quieter MIDI notes use proportionally less index; this controls timbre rather than directly setting output volume.
Phase mode
Legacy follows the oscillator's Phase Reset switch. Reset restarts oscillator and modulator phases at note-on; Free keeps their running phase; Random chooses new starting phases. Use Reset for repeatable attacks and Free or Random for variation.
Quality / Level Compensation
The FM options include Legacy and 2x quality and level compensation. Higher quality can cost more CPU; compensation helps with level changes but is not a mastering limiter.
Recipes
FM recipes are Clean, Bass, Electric Piano, Bell, Glass, Pluck, Metal, Growl and Percussion. Each sets a combination of index, ratio, motion, feedback, velocity response, modulator wave, phase, quality and compensation. They are starting settings, not additional algorithms; save your own patch before trying them.
04 Colour controls
Choose Colour in SHAPE. Its processing changes the oscillator's harmonic character without adding an external effect slot.
AMOUNT
Set the strength of the selected colour treatment. In Warm, Fold, Bend and Bite this blends the original oscillator with the treated signal. Classic uses the waveform's original shape-dependent processing, so its response depends on the source wave.
Classic
Use the original waveform-specific colour behaviour. BIAS has no effect in this mode.
Warm
Apply soft saturation. BIAS offsets the saturation curve to change its asymmetry; the processing compensates for the resulting DC offset.
Fold
Fold the waveform back on itself to create additional harmonics. BIAS moves the folding symmetry, changing the balance of the resulting tone.
Bend
Distort the oscillator's phase within each cycle rather than shifting its fundamental pitch. BIAS changes the position of the phase-bending curve.
Bite
Apply different saturation strengths to positive and negative waveform halves for a sharper character. Positive and negative BIAS favour different halves.
BIAS
Range -100 to +100. Zero is the reference position; move either way to alter the chosen algorithm's symmetry. Its effect varies by mode, and Classic ignores it.
05 Sync controls
Sync uses an internal master at the played pitch to synchronise this oscillator. It does not require another main oscillator to be enabled.
AMOUNT
Raise the synced oscillator's internal tuning relative to its master. Sweep it for changing harmonics while the reset cycle follows the played note. TUNE determines whether this movement is continuous or stepped.
Hard
Reset the oscillator phase at each master cycle for the conventional hard-sync character.
Soft
Pull the phase partway towards the reset point instead of forcing a complete jump. This produces a different, less abrupt synchronisation behaviour.
Rev
Alternate the oscillator's playback direction at successive master resets.
Window
Combine hard reset with an amplitude window around the cycle boundary to soften the transition.
Free
AMOUNT moves the internal tuning continuously from 0 to 24 semitones above the master.
Semi
Quantise the same 0–24-semitone range to whole semitone steps.
Harm
Step through frequency multiples 1–8 of the master, rather than equally spaced semitones.
Oct
Step through 0, 12, 24 and 36 semitones above the master.
06 Exponential FM controls
Exp FM modulates pitch in semitone space. Large depths can move the perceived pitch substantially; it behaves differently from the ordinary FM mode.
DEPTH
Set the strength of pitch modulation from 0 to 100%. The Depth Mode in CONFIG determines how that percentage becomes a pitch interval.
WAVE
Choose Sine, Tri, Saw, Pulse or Noise for the internal modulator. Smooth waves give smoother pitch movement; sharp waves and Noise create more abrupt or irregular changes.
RATIO / FINE
Set modulation frequency relative to the played pitch. RATIO spans 0.5–10 in half-unit steps; FINE spans -50 to +50 and adds hundredths to the ratio. For example, RATIO 2 with FINE -25 gives 1.75. Musical Ratios in CONFIG sets both together.
Depth Mode: Classic
Depth scales with the frequency ratio: at full DEPTH the peak excursion is ratio × 12 semitones before motion and velocity scaling. Changing RATIO therefore changes both modulation speed and depth.
Depth Mode: Fixed
DEPTH controls an excursion up to 24 semitones independently of RATIO. Change modulation speed without automatically changing its depth.
Depth Mode: Interval
Quantise the effective depth to 0, 1, 2, 5, 7, 12 or 24 semitones. Motion and velocity can move the effective depth between these steps; this does not quantise the final audio to a musical scale.
Motion
CONFIG offers Off, Fast Decay, Medium Decay, Slow Decay and Slow Rise. These shape depth after note-on using the same rising/decaying behaviour described for FM, but Exp FM has FINE rather than a MOTION control on its panel.
Feedback
Feed the modulator back into its own phase to roughen its waveform. The choices are 0, 10, 25, 50, 75 and 100%.
Velocity to Depth
Choose 0, 25, 50, 75 or 100%. Greater sensitivity reduces depth more strongly on softer notes; zero leaves depth independent of note velocity.
Phase
Choose Legacy, Reset, Free or Random, as for FM. Reset favours repeatable starts; Free retains running phase and Random varies the starting phase.
Recipes
Classic, Rubber, Siren, Laser, Riser, Chime, Growl and Chaos set combinations of depth, ratio, depth mode, motion, feedback, velocity response, wave and phase. They replace those settings rather than adding a second effect.
CONFIG differences
Exp FM does not expose the ordinary FM Quality or Level Compensation options. Its Fine ratio is directly on the panel.
07 AM controls
AM changes the oscillator's amplitude using an internal modulator. At audio rates this creates additional frequency components, not just a slow volume wobble.
AMOUNT
Blend from the unaffected oscillator at zero towards full amplitude modulation at 100%. This is modulation depth, not the oscillator's LEVEL.
Classic
Use unipolar modulation to reduce the signal's amplitude through the modulator cycle without reversing its polarity.
Ring
Use bipolar modulation. At full depth the signal is multiplied by the modulator, including polarity inversion on its negative half-cycle, giving ring-modulation character.
Rect
Use the absolute value of the modulator. Negative halves are flipped positive, producing a different repeating amplitude pattern without polarity reversal.
Chop
Switch between open and closed states according to the modulator's sign. AMOUNT determines how deeply the closed state attenuates the sound.
WAVE
Choose Sine, Tri, Saw, Pulse or Noise. The chosen wave is transformed by MODE, so the same wave can behave differently in Classic, Ring, Rect and Chop.
RATIO / FINE
Set modulator speed relative to the played pitch. RATIO spans 0.5–10 in half-unit steps; FINE adds -0.50 to +0.50 in hundredths. This FINE is a ratio offset, not oscillator detuning in cents.
08 Unison controls
Choose Unison in SHAPE. This mode generates two copies per oscillator, independently of the synth engine's Poly setting.
AMOUNT
Separate the two copies in pitch using a curved response: small values give fine beating, while large values move far beyond subtle detune. At maximum, one copy is an octave above and the other an octave below the base frequency.
SPREAD
Range -100 to +100. At zero, both copies are mixed equally into left and right. Moving away from zero separates them across the stereo field; opposite signs swap the sides, and either extreme gives full separation.
LEVEL / PAN
The normal oscillator LEVEL and PAN still apply to the combined result. Check mono playback, since the stereo arrangement and beating can change how the sound combines.
Voice count
There is no adjustable Unison count in this mode. Engine polyphony controls simultaneous played notes; it is not the number of copies created by Unison.
09 Utility icons
Copy / Paste
Open the source oscillator’s Copy / Paste icon and choose Copy oscillator settings. Open the destination oscillator’s same menu and choose Paste oscillator settings. This replaces the destination’s values; macro and modulation assignments stay with the destination. Save first if you need to preserve its previous sound.
Phase Reset
Restart oscillator phase for more repeatable note attacks. This differs from the oscillator's Sync shaping mode.
Invert
Invert polarity. It may have little effect on a solo oscillator but can alter cancellation when mixed with correlated signals.
Initialise
Right-click the oscillator’s enable/power control and choose Initialise to reset that oscillator’s parameters to their defaults. This is a local reset, not a reset of the whole preset, and differs from Phase Reset. Save first if you need the current settings.
TRY IT IN FLITE
A clear starting patch
Solo one oscillator and choose an analogue saw.
Keep shaping off while setting its level and tuning.
Add a second oscillator quietly and detune it slightly.
Compare the stereo and mono result before adding effects.
Map audio onto keys and shape how each sample plays.
A Sampler instrument combines audio in a pool with zones that decide which notes and velocities trigger it. Importing a file and mapping it are related but separate operations: a pooled file without a playable zone may not sound.
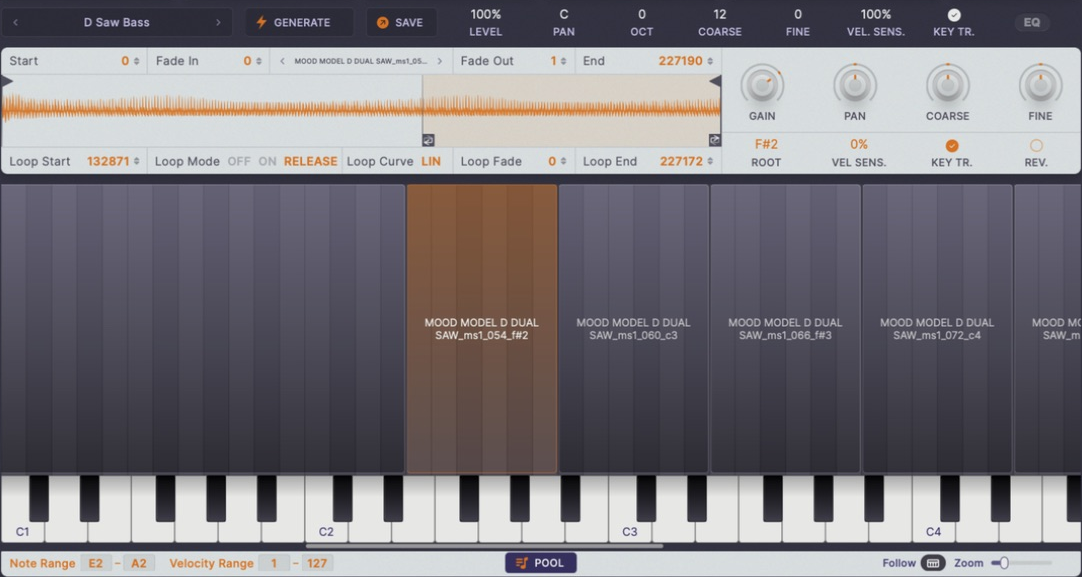
Sampler editor — waveform, sample zones and keyboard mapping · Click to enlarge
01 Instrument and audio
Instrument selector
Load an existing sampler instrument (.finst). The instrument contains mapping and playback setup, not just a waveform.
Initialise the Sampler
Open the instrument-name menu and choose Initialise for a fresh start in this slot. It clears the loaded sampler content, resets instrument parameters and the full note range, switches off engine B assignment and detaches this slot’s macro targets. It does not initialise the other sources or the whole preset. Save your work first.
Clear Layout / Clear All
The instrument menu also offers these narrower clearing actions: Clear Layout removes the mapping while retaining the audio pool; Clear All clears the instrument including its pooled audio. Use Initialise when you also want the slot’s default settings. These actions clear the loaded state, rather than deleting your saved library files.
Audio pool
Inspect the audio available to this instrument, audition files and map them into zones.
Generate
Open provider-based text-to-audio generation. API setup, credits and usage permissions are covered in the AI generation chapter.
Save
Store the sampler instrument. The orange outline after loading raw or generated audio prompts you to save; opening an existing .finst does not require this unsaved-audio prompt.
02 Keyboard mapping
Zone range
Set the lowest and highest keys a zone responds to. Overlapping zones can create layers.
Root
The note at which the sample is treated as its original pitch. This is not necessarily the lowest mapped note.
Velocity range
Restrict a zone to a range of playing strengths. Use separate ranges for soft and hard samples.
Mapping keyboard
Inspect which keys are covered and audition the mapped result. A correct-looking waveform does not guarantee the currently played key is mapped.
Follow (MIDI Follow)
When enabled, playing a mapped note selects the sample triggered by that note and velocity for display in the editor. Disable it to keep editing one sample while playing other notes. It changes editor selection, not pitch tracking, tempo sync or the mapping itself.
Zoom
Change the keyboard mapping view's scale for easier zone editing. This changes the view, not the sample's pitch or audio duration.
03 Instrument controls versus selected sample
Select a sample zone before changing the waveform-side controls. Check Follow if the selection unexpectedly changes while you play.
Top-row LEVEL and PAN
These balance the entire loaded instrument. The GAIN and PAN beside the waveform affect only the selected sample, so use them to balance individual samples without changing the whole slot.
Top-row OCT, COARSE and FINE
Tune the whole instrument in octaves, semitones and cents. These offsets combine with the selected sample's own coarse and fine tuning.
Instrument VEL. SENS.
Set how much playing velocity changes the instrument's level. Zero removes this level response; 100% gives the full squared-velocity response, making softer notes quieter. Sample-level velocity sensitivity can further reduce their level, so enabling both compounds the response.
Instrument KEY TR.
Enable note-dependent pitch tracking for the instrument. In the Sampler, both this switch and the selected sample's KEY TR. must be enabled for played note pitch to transpose that sample.
Selected sample GAIN
Adjust only this sample from -40 to +20 dB. Balance mismatched recordings here, then use the instrument LEVEL for the overall sound.
Selected sample PAN
Position this sample left or right within the instrument. Its pan combines with instrument-level panning.
Selected sample COARSE / FINE
Transpose this sample by -24 to +24 semitones and fine-tune it by -50 to +50 cents. These are separate from the instrument's top-row tuning.
ROOT
Declare the MIDI note corresponding to the sample's original pitch. With key tracking enabled, notes are transposed relative to this root. Changing ROOT does not change the zone boundaries or automatically detect the recording's pitch.
Selected sample KEY TR.
Enable pitch following for this sample, provided instrument KEY TR. is also enabled. With either switch off, different mapped keys trigger the sample without note-dependent transposition; tuning offsets still apply. Useful for drums and fixed-pitch effects.
Selected sample VEL. SENS.
Range 0–100%. Zero leaves this sample's level independent of velocity at this stage. At 100%, level follows squared normalised velocity. This is not Velocity Range: sensitivity changes loudness, whereas the zone's velocity limits decide whether it triggers.
REV.
Reverse the selected sample's playback direction. This does not reverse the MIDI sequence or the keyboard mapping.
04 Sample boundaries and looping
Fade In / Fade Out
Soften the beginning and ending of the playback region. These sample-edge fades are separate from the synth amplitude envelope and from the loop crossfade.
Loop Start / Loop End
Set the region repeated while looping. Keep both points inside the usable sample region and audition the join.
Loop Mode: OFF / ON / RELEASE
OFF plays without repeating the loop. ON keeps playback looping during the release stage. RELEASE exits the loop after note release and continues towards the sample end; the amplitude envelope still affects what you hear.
Loop Curve
Choose the linear or exponential loop-fade curve. Compare the join by ear: the best result depends on the audio either side of the boundary.
05 Sample playback
Start / End
Limit the part of the source used during playback. Check attacks after trimming so you do not cut off the transient.
Loop controls
Enable and set the looping region for sustained playback. Looping repeats a region; it is not the same as slicing the region into separate notes.
Loop Fade
Blend the loop boundary to reduce clicks. Longer crossfades can soften or blur rhythmic material.
Gain
Adjust sample-level gain before relying on the main source level to balance the whole instrument.
Auto Loop / Auto Slice
Access sample context-menu tools. Auto Loop helps find a loop; Auto Slice detects transient divisions and creates mapped slices.
TRY IT IN FLITE
Turn a one-shot into a playable instrument
Import the audio into the Sampler pool.
Create a zone covering your desired keys and set the correct root.
Trim unwanted silence while retaining the attack.
Adjust gain, audition low and high keys, then save a new .finst.
Keep file management separate from keyboard mapping and whole-preset saving.
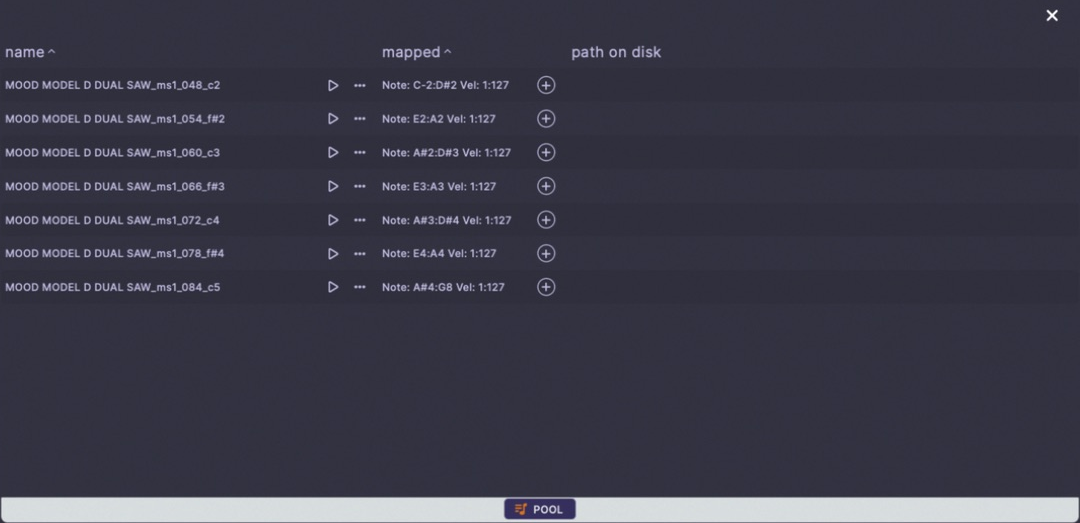
Audio Pool — sample files, audition controls and note mappings · Click to enlarge
01 Pool list
Name / path on disk
Identify the sample and its source location. Use the path information when tracing missing or unexpectedly duplicated audio.
Preview
Audition a pooled sample independently of the current keyboard zone. Hearing preview audio does not mean its zone is assigned to your played note.
Mapped on
Inspect the note and velocity ranges associated with the file.
Add / mapping controls
Place a pooled sample into the instrument mapping. Check its root and key range after adding.
Multiple selection
Select several rows when you need a group operation.
Delete / Delete All
Delete is the single-file action. With multiple selected rows, Delete All refers to the selected set, not every file on your computer. Review the selected set before confirming any removal.
02 What to save
.finst
Save Sampler mapping and instrument data for reuse in a source slot.
.fsamp
Save the Granular sample definition for reuse by a granular source.
Exclude unmapped audio
The sampler save option can omit unused pooled audio. Do not enable it if you want to retain unmapped material for later editing.
Full preset
Save at the preset level to preserve the combined sources, sequencers, filters, effects and assignments.
Backup
Keep copies of user instruments, sample material and DAW sessions. Test moving a saved instrument in a copy of a project before removing its original source files.
Transform one sample into a cloud of short overlapping grains.
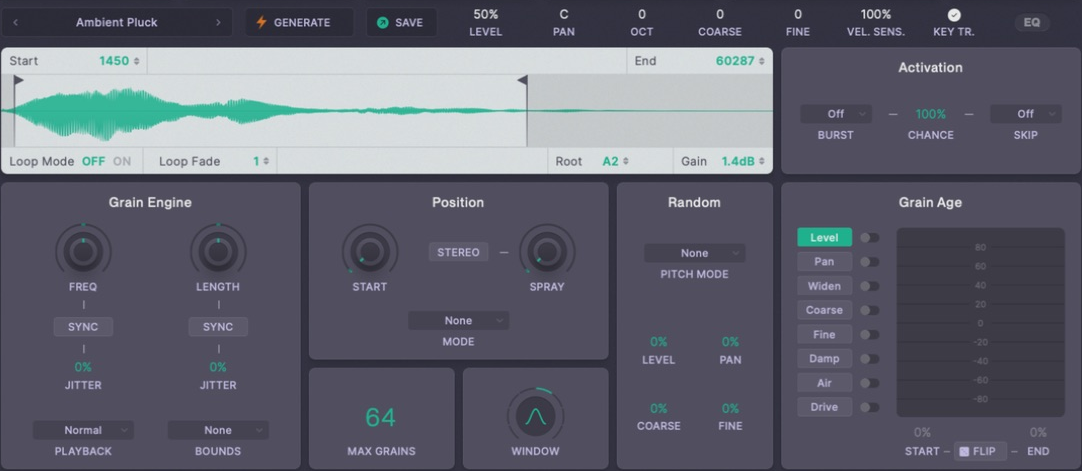
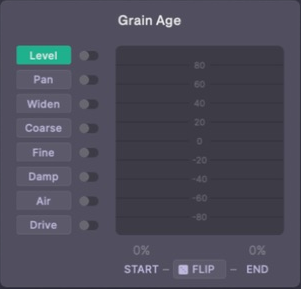
Granular editor — grain engine, position, randomisation and Grain Age · Click to enlarge
01 Source region
Load / Generate / Save
Choose audio, generate it through a provider, or save a granular sample definition. Saving a definition differs from saving the complete preset.
Initialise the Granular slot
Open the sample-name menu and choose Initialise to clear the loaded granular content and restore the instrument slot’s defaults. It also restores the full note range, switches off engine B assignment and detaches the slot’s macro targets. Save first; this is a reset of this slot, not the whole preset.
Start / End / Loop Fade
Set the usable sample region and smooth a looping boundary. Watch the waveform and grain positions while auditioning.
Root / Gain
Set the source's pitch reference and level. Granular pitch changes and the source root work together; tune the root before adding random pitch.
02 Activation
Rate / Sync
Choose the grain trigger speed in free-running or tempo-related units. Faster triggering usually produces a denser cloud.
Rate Jitter
Vary the interval between grain triggers. Small amounts break up mechanical repetition.
Chance
Control the likelihood of a grain trigger occurring.
Burst / Skip
Introduce grouped triggers or skipped events. Available divisions include Off, 2, 4, 6 and 8.
03 Playback and position
Normal / Reverse / Random
Choose forward, reverse or randomly selected playback direction.
Position
Set the source region from which grains are taken. Moving position scans through different timbres in the recording.
None / Scan / Drift / Swarm
Choose a fixed position or an automatic position behaviour. The panel reveals the relevant controls for the selected mode.
Scan Rate / Key Track
Control systematic movement through the sample and whether scan behaviour follows played pitch.
Drift Rate / Bias
Set the speed and tendency of position wandering.
Swarm Range
Spread positions around the base location to explore a wider part of the sample.
04 Grain shape
Length / Sync / Length Jitter
Set grain duration and optional rhythmic synchronisation, then vary duration per grain. Short grains can become buzzy; long grains retain more source detail.
Spray / Stereo Spray
Disperse grain starting positions and stereo placement. Use moderate values when preserving a recognisable attack.
Bounds: None / Contain / Wrap
Choose how the grain player handles the selected sample boundaries. Compare modes near the edges of a short source region.
Window
Shape the amplitude contour of each grain. Choices include Box I, Box II, Triangle, Cosine, Hann, Spike, Fall and Rise.
Max Grains
Limit simultaneous grains. Higher limits allow denser overlap but can raise processing cost.
05 Random variation
Random Level / Pan
Vary loudness and stereo placement from grain to grain.
Coarse / Fine
Introduce large or small pitch variation. Start with small fine variation for shimmer before trying wide coarse intervals.
Pitch mode
Constrain random pitch with None, Fifth, Octave, Chromatic, Major or Minor. A constraint is not an automatic analysis of the musical key of your source.
TRY IT IN FLITE
Make a pad from a short recording
Load a sample and choose a region with interesting sustained texture.
Use a smooth window and enough grain overlap to avoid isolated clicks.
Choose slow Scan or a small Swarm range.
Add gentle fine-pitch and pan variation, then shape the voice with a slow envelope.
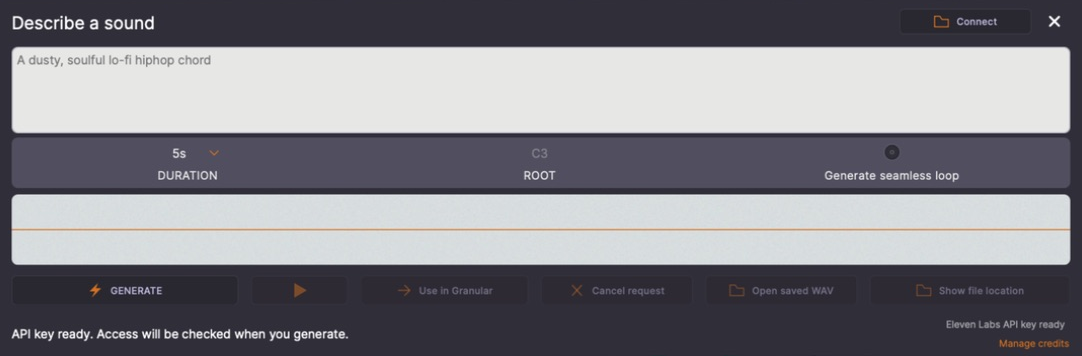
Create a new source with ElevenLabs or Stable Audio, then edit it in Flite.
Generate in Granular — ElevenLabs ready, before generation · Click to enlarge
01 Provider connection
Generate / provider choice
Open Generate from the Sampler or Granular editor. The selected provider is remembered; use the generation panel's provider controls when you want to change it.
Connect
Click Connect to open Connect ElevenLabs or Connect Stable Audio. This is an API connection screen, not the Wavea licence login. Use Signin to open the provider's login page in your browser, or create an account if needed. Enter your provider password only on its website, not in Flite's API-key field.
Create and copy an API key
After signing into the provider in your browser, use the connection screen's API key / Create API Key link to reach its key-management page. Create a key with generation access and copy the complete key using the provider's copy control. Use a key for the selected provider, not your Wavea password or a key from the other provider.
Paste the key into Flite
Return to the connection popup, click the field labelled Paste API key here, then press Command-V on Mac or Ctrl-V on Windows. To replace an old key, select the field's contents with Command-A or Ctrl-A before pasting. The characters are masked for privacy. Copy only the key value, without quotation marks or an Authorization/Bearer prefix.
Finish connecting
Choose whether to remember the key securely, then use the popup's connection button. Read the status before generating. ElevenLabs can show API key ready because restricted Sound Effects keys cannot read account details; actual generation access is checked when a request is made. A ready status alone does not prove sufficient credit or permissions.
Login is not connection
Signing into the provider website does not automatically connect Flite: you still need to paste the API key. Likewise, signing into Wavea unlocks your Flite licence but does not supply an ElevenLabs or Stability API account.
Connection problems
For an invalid-key message, copy a fresh complete key from the correct provider and check its permissions. For credit or quota errors, check the provider's API account allowance. Network errors are different from a rejected key. Never include the key in screenshots, presets or support messages.
Forget a saved key
Use the connection popup's Forget action to remove the saved credential from this computer. Other already-open Flite windows may still retain a session copy. Close those windows if you need to clear their session access too.
Remember key
Optional local credential storage uses macOS Keychain or Windows Credential Manager. Keys are not saved into presets or DAW state.
Credits / balance
Generation consumes your provider's API allowance. A website subscription may not include API credits. Stable Audio offers an API balance check; provider account capabilities differ.
02 Describe and generate
Describe a sound
Describe the material, texture and desired musical role. Start with a focused request, then refine it after hearing the result.
Duration
Choose an available generation duration. Supported choices depend on the provider.
Root
Choose the pitch reference used when preparing the generated source. It does not guarantee the service generates a sound tuned to that pitch.
Auto-map
Use the available automatic mapping option to place generated Sampler audio into the keyboard mapping.
Auto-loop
Use the available loop option when preparing material for repeated playback. Check the resulting boundary by ear rather than assuming it is seamless.
Generate / cancel
Submit the request, wait for the result, then audition it. Cancelling or closing the panel may not prevent the provider charging for an already submitted request.
Save
Keep a useful result as an instrument/sample and save the full patch if you changed other modules.
TRY IT IN FLITE
Generate a useful starting texture
Connect a provider account with API access and available credits.
Describe a short texture clearly, such as a soft metallic shimmer with a gentle decay.
Generate once, audition it, then trim or loop the useful part.
Turn a loop into playable slices and reconstruct its timing in your DAW.
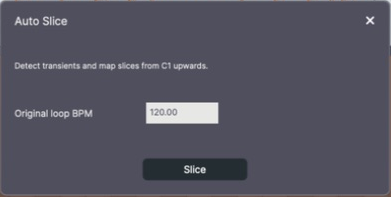
Auto Slice detects transient boundaries inside a loop region and creates consecutive source slices. The slices are named, added to the pool and mapped chromatically from C1. MIDI export is available once a slice set exists.
Auto Slice — enter the source loop tempo before slicing · Click to enlarge
01 Slice the loop
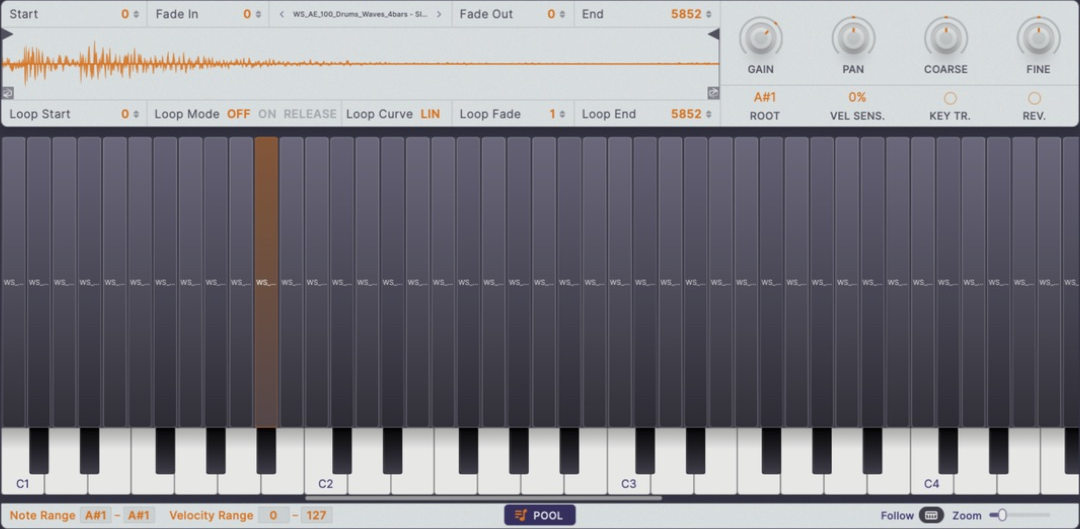
Sliced loop — chromatic mapping with the A♯1 slice selected · Click to enlarge
Prepare the region
Use a clean loop and check its start and end before slicing. Extra silence or a partial first hit can give you an unexpected first slice.
Auto Slice
Right-click the sample and choose Auto Slice. Enter the original loop BPM (20–400), then Slice. This replaces that sample's mapping while retaining its original audio in the pool. Other samples are not overwritten; protected pack instruments cannot be sliced in place. Audition the result because soft attacks and noisy material can divide unexpectedly.
Chromatic mapping
Each successive slice is mapped to the next semitone starting at C1. DAWs can label octaves differently; compare the actual triggered notes rather than the octave text alone.
Pool entries
The slice audio is available in the pool with names derived from the source. Save the instrument after checking the map.
02 Reconstruct and rearrange
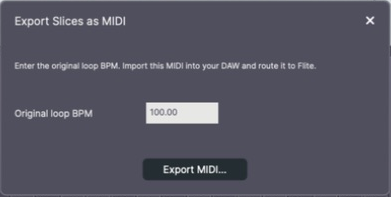
Export Slices as MIDI — original loop tempo and export · Click to enlarge
Export slices as MIDI
Use the separate third context-menu item, Export Slices as MIDI, once slices have been cut. Confirm the original loop BPM in its dialog before exporting the notes that trigger the slice mapping.
Tempo
Import the MIDI into your DAW and use the original loop tempo as the first playback check. Changing project tempo changes note timing, not the intrinsic duration of each audio slice.
Playback accuracy
Keep the corresponding slice instrument loaded and avoid accidentally transposing its trigger notes. Envelope attack, effects and DAW scheduling can change the audible reconstruction.
Gaps and overlap
At slower tempi, gaps may appear between short slices; at faster tempi, slice tails may overlap or be cut by your voice/gate settings. This is not a promise of transparent time stretching.
MIDI versus audio
The MIDI file does not contain the slice audio. Move or back up the sampler instrument and required audio along with the MIDI.
TRY IT IN FLITE
Rebuild a loop, then change its groove
Choose the loop region and run Auto Slice.
Audition every slice on consecutive keys.
Save the .finst and export the slice MIDI.
Play the MIDI back through that instrument at the original tempo.
Duplicate the MIDI clip, then rearrange notes or change tempo.
Shape a note's lifetime or move other parameters with a triggered contour.
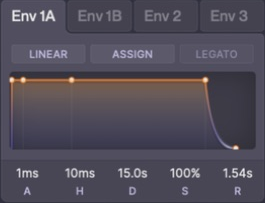
Env 1A and Env 1B provide the amplitude-envelope views for the two engines. Env 2 and Env 3 provide additional envelope sources. The visible contour is A–H–D–S–R: Attack, Hold, Decay, Sustain and Release.
Envelope 1A — Attack, Hold, Decay, Sustain and Release · Click to enlarge
01 Contour
Attack
Time taken to rise at the beginning of a note. Short values preserve percussive attacks; longer values create fades.
Hold
Time spent at the upper level before decay. This is different from the global Hold button, which holds MIDI notes.
Decay
Time taken to fall from the upper level towards sustain.
Sustain
The level held while the note remains active. It is a level, not a time value.
Release
Time taken to fade after note-off. Long releases allow voices to overlap and increase the number of active voices.
02 Behaviour and assignment
Linear
Change the envelope curve behaviour. Compare it by ear: equal time settings do not necessarily sound equally sharp with a different curve.
Legato
Change retrigger behaviour for overlapping notes in the appropriate playing mode. Use it for connected lead playing.
Tempo divisions
Right-click a time value to select Free or a tempo division. Attack, Hold, Decay and Release have separate sync choices; Sustain does not.
Assign
For an assignable envelope such as Env 2 or Env 3, drag the destination parameter’s text label (for example, filter CUTOFF) onto that envelope’s ASSIGN control and release. Drag the label, not the knob: dragging the knob normally changes its value. Only eligible modulation destinations are accepted, and the envelope needs an available target slot.
03 Assigning an envelope: step by step
Env 1A and Env 1B already shape their engines’ amplitude. An additional envelope needs a destination and a non-zero modulation amount before it changes another parameter.
1. Choose the destination
Set a useful starting value on the parameter you want to animate. For a filter pluck, lower CUTOFF enough that an upward sweep has room to be heard.
2. Make the connection
Select Env 2 or Env 3, then drag the CUTOFF label onto its ASSIGN control. Alternatively, click ASSIGN to open the envelope’s assignment view and choose an eligible destination there.
3. Set modulation depth
Open Modulation Overview and find the envelope’s destination. Adjust Amount: a positive amount moves above the base value as the envelope rises; a negative amount moves below it. A connection with zero depth makes no audible change.
4. Shape and audition
Play notes while adjusting Attack, Hold, Decay, Sustain and Release. For a pluck, try a short Attack, short Decay and low Sustain. Listen to the combination of base cutoff, envelope contour and modulation amount.
If the drop is rejected
Check that you are dragging a modulatable parameter label onto ASSIGN, that this destination is not already attached to the same envelope, and that the envelope has a free target slot. Inspect existing routes in Modulation Overview.
TRY IT IN FLITE
A plucked synth envelope
Choose a short Attack and Hold.
Set a short Decay and low Sustain.
Use a modest Release so note endings remain tidy.
Apply an additional envelope to filter cutoff for an opening-and-closing tone.
Program pitches and note articulation for each engine.
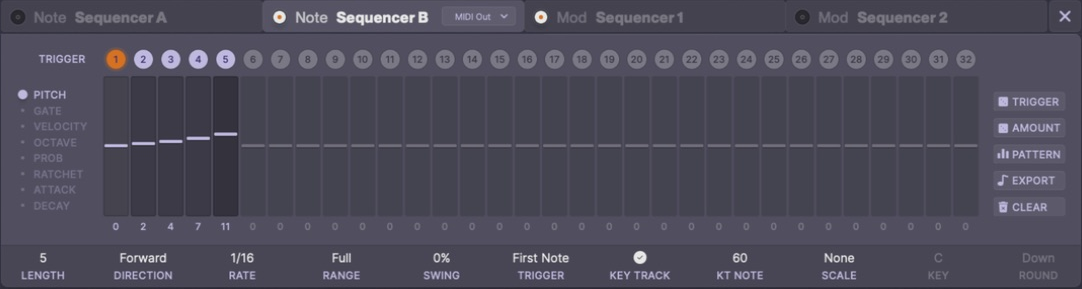
The Note Sequencer generates notes; the Mod Sequencer generates parameter movement. Select A or B for the corresponding engine. A held input note is needed for the note sequence to run; the header Hold function is useful when auditioning.
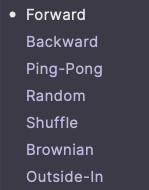
The Direction menu offers Forward, Backward, Ping-Pong, Random, Shuffle, Brownian and Outside-In. The menu screenshot shows Forward selected.
Note Sequencer B — Pitch lane with five active steps · Click to enlarge
01 Pattern timing
Direction menu — seven playback modes · Click to enlarge
Length
Set the number of active steps, up to 32, in the pattern.
Rate
Set the rhythmic duration of a step.
Swing
Redistribute timing between alternating steps. It changes groove without simply doubling the overall rate.
Trigger
Choose first-note or each-note retrigger behaviour. Overlapping notes can therefore restart or continue the pattern differently.
Direction
Forward reads left to right; Backward reverses it; Ping-Pong bounces between ends; Random may repeat steps. Shuffle visits each step in a shuffled cycle; Brownian walks to a neighbouring step or stays; Outside-In alternates from the outer edges inward.
02 Step lanes
Enable
Toggle whether a step plays. Disabled steps still occupy their place in the pattern.
Pitch / Octave
Set the note and its octave offset.
Gate
Set how long each note is held relative to its step. Very short gates emphasise transients; longer gates interact with the envelope's sustain and release.
Velocity
Set the strength of the note. Its audible effect depends on the patch's velocity response and assignments.
Probability
Set the chance of a step playing. Intermediate probabilities make repeated passes differ.
Ratchet
Repeat a step within its time slot. Increasing repeats produces rolls and stutters.
Attack / Decay
Apply per-step envelope articulation inside Flite. These are not standard note attributes included in a MIDI file.
03 Pitch rules
Key Track / KT Note
Transpose the authored pattern relative to played input using the configured reference note.
Scale / Key
Constrain notes to a chosen scale and musical key. None leaves the scale constraint off.
Round
Choose how off-scale values move to an allowed pitch.
Range
Compress the pitch excursions of the authored lane. This is distinct from an instrument's keyboard range.
04 Note pattern types
Patterns write Pitch and Octave across the active length, rather than changing playback direction. Scale degrees use the selected scale; None uses Major for pattern generation. Save before replacing your own notes.
Root-Fifth
Alternate root and fifth scale degrees.
Triad Up
Repeat root, third and fifth degrees.
Triad Down
Repeat fifth, third and root degrees.
Seventh Up
Repeat root, third, fifth and seventh degrees.
Seventh Down
Repeat seventh, fifth, third and root degrees.
Alberti Bass
Repeat root, fifth, third, fifth for a broken-chord accompaniment.
Octave Pedal
Alternate root and twelve semitones above it.
Chord Inversions
Cycle rising broken-chord voicings with lower chord tones moved into higher octaves. These are successive notes, not simultaneous chords.
Start at the root, then stay or move one degree up/down per step, bounded within seven degrees either side. Selecting it generates a stored walk, not a new walk every playback cycle.
Fractal Motif
Repeat degrees 0, 1, 0, 2, 0, 1, 0, 3, raising each eight-step block by two scale degrees.
05 MIDI destinations
Host / DAW
Choose Host / DAW in the sequencer output selector. Create another MIDI/instrument track, select Flite's track/plugin MIDI output as its input, load the receiving instrument, and enable monitoring or recording. Trigger Flite's sequence with incoming notes. Availability depends on host and plugin format; not every AU/VST3 host exposes instrument MIDI output. Do not route the receiving track back into Flite, which can cause MIDI feedback.
Export
Click EXPORT to save a .mid file or drag EXPORT onto a DAW MIDI track that accepts file drops. If dragging is unsupported, save and import the file. The file contains notes, not audio or the Flite preset: keep the intended instrument on the receiving track.
Exported order
File export follows the authored lane from left to right. It does not capture the live Direction setting as a performed pass.
Random playback
Probability is exported as a deterministic snapshot, not every possible future pass. Record live MIDI in a compatible host if you need a particular performance.
No sound in a MIDI file
A MIDI export contains note events, not Flite audio, effects or all internal modulation. Keep the preset available for the intended sound.
TRY IT IN FLITE
Build a short pattern
Select engine A's note sequencer and use a short length.
Hold a note, or enable global Hold for auditioning.
Enter a few pitches and vary Gate and Velocity.
Add a ratchet to one step and compare with probability at 100%.
Export the pattern and check it in the DAW before using it in an arrangement.
Draw rhythmic changes to sound parameters without creating new notes.
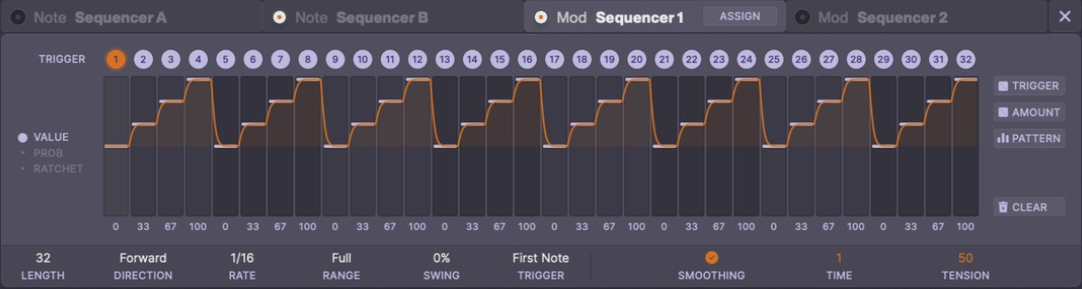
Mod Sequencer 1 — repeating value ramp with smoothing enabled · Click to enlarge
01 Lane and timing
Steps / Amount
Each step stores a modulation value. It only changes the sound once the sequencer is assigned to a destination.
Length / Rate / Swing
Set pattern length, step duration and alternating rhythmic feel.
Direction / Trigger
Choose the step traversal and restart behaviour. The current source exposes the same seven direction choices as the note sequencer.
Probability / Ratchet / Range
Vary step occurrence, repeated substeps and value range. Compare against a simple deterministic pattern when debugging unexpected movement.
02 Modulation pattern types
Patterns replace VALUE across the active length. RANGE still scales the result and smoothing shapes transitions. They do not assign a destination or change playback direction. Randomised choices generate stored values when selected, not new values on every cycle. Mod Sequencers output internal modulation, not note MIDI files or external MIDI CC streams.
Shapes: Sine
Sample a sine cycle with positive and negative movement.
Shapes: Triangle
Rise and fall linearly across the cycle.
Shapes: Saw Up
Rise from minimum to maximum across the active steps.
Shapes: Saw Down
Fall from maximum to minimum.
Shapes: Square
Hold high for the first half, low for the second.
Rhythmic: Pump
Repeat a four-step curved rise from low to high.
Rhythmic: Sidechain
Make a zero-to-full ramp per quarter-note beat. Incompatible slow or dotted rates switch to 1/16. Assign to a suitable level destination for ducking-style motion; this is not an audio sidechain detector.
Rhythmic: Offbeat
Alternate a modest negative value with a full positive accent.
Rhythmic: Syncopated
Repeat eight unequal positive and negative accents.
Rhythmic: Bounce
Alternate positive and negative values with diminishing magnitude over eight steps.
Organic: Smooth Random
Generate random anchors every four steps and interpolate between them. Playback smoothing remains separate.
Organic: Random Walk
Start at zero and make small random changes within the available range.
Organic: Turing Loop
Generate an eight-value motif from seven discrete levels, then repeat it. It does not continuously mutate.
Spatial: Pan Sweep
Make a cosine-shaped excursion from one extreme to the other and back. Assign to pan for stereo motion or use another destination.
Spatial: Centre Out
Alternate positive and negative values with increasing distance from centre.
Spatial: Outside In
Alternate extremes while progressively approaching centre.
Euclidean: 3 Pulses / 5 Pulses / 7 Pulses
Distribute the chosen number of high-value pulses as evenly as possible across the active steps, with low values elsewhere. Pulse count cannot exceed sequence length. These are modulation values, not MIDI notes.
03 Shape the movement
Smoothing enabled
Blend transitions rather than jumping immediately between values.
Smoothing Time / Tension
Control how long transitions take and their contour. Too much smoothing can erase a deliberately sharp rhythmic pattern.
Pattern menu
Choose a starting pattern, then edit the lane. A pattern is data, not an effect inserted in the audio path.
Rhythmic → Sidechain
Create a repeating rise from low to high within each beat. Assign it to an appropriate level destination for a pumping effect; the pattern alone does not duck the sound.
Assign
Select a destination and set modulation amount. The same pattern can drive level, cutoff or another eligible parameter for very different results.
TRY IT IN FLITE
Make a pumping level contour
Load Rhythmic → Sidechain.
Assign the mod sequencer to the intended source or amplitude parameter.
Adjust base level and route depth so the low point ducks and the rise restores level.
Match rate/length to the rhythm and adjust smoothing by ear.
Turn several parameter changes into one useful performance control.
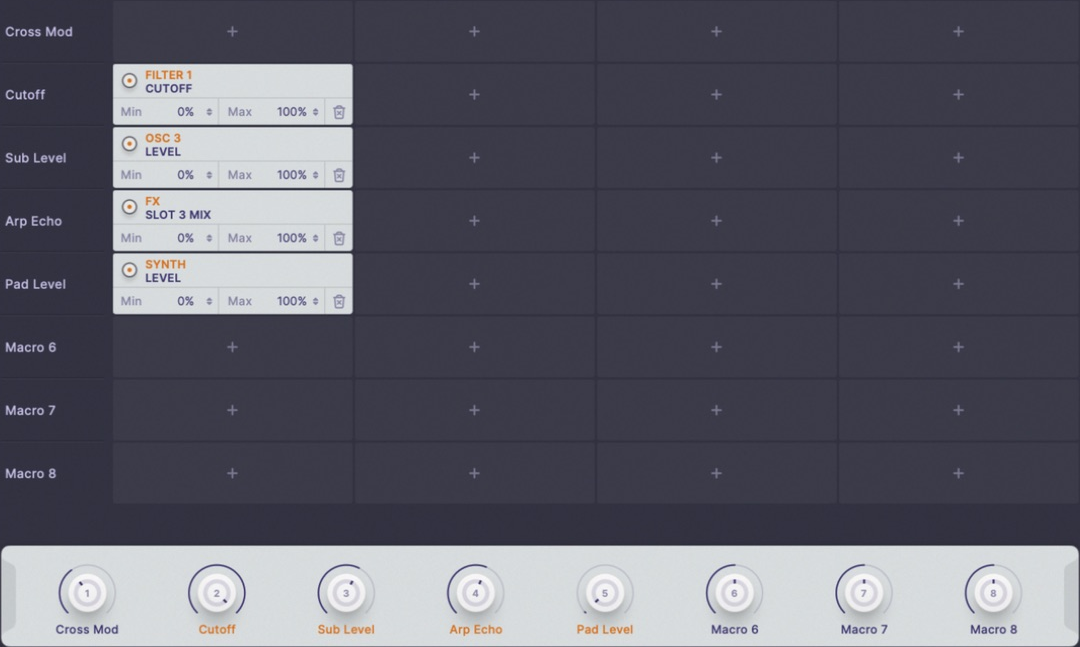
Macro Overview — eight macros, four target slots per macro · Click to enlarge
01 Make an assignment
Drag a parameter label
Drag an eligible parameter's label onto a macro knob or its label. Alternatively, drag a macro label onto a supported destination knob, or choose the destination in Macro Overview. Dragging the parameter knob itself normally changes its value rather than assigning it.
Macro Overview
Inspect the destinations assigned to each of the eight macros. The destination selector provides an alternative when a small label is awkward to grab.
Name
Choose a performance-oriented name, such as Brightness or Space, rather than leaving an important macro unnamed.
Amount
The macro's current position is mapped into each destination's assigned range.
02 Control the range
Minimum / Maximum
MIN is the destination position at macro 0%; MAX is its position at macro 100%. These are percentages of the destination's normalised control range, not necessarily its displayed units. MIN 20 and MAX 70 restrict travel to that part of the control; halfway maps to 45%. For nonlinear controls such as frequency, this need not be the arithmetic midpoint in Hz.
Inverted movement
Set MIN higher than MAX to reverse movement. MIN 80 and MAX 20 make the destination fall as the macro rises. Equal endpoints hold it at a fixed position. Each target can have a different range and direction.
Destination knob: inner control
The main knob and its indicator represent the parameter's current control value. Once macro-controlled, that value follows the macro mapping. Do not confuse the current value with the endpoints of the allowed macro travel.
Destination knob: outer macro ring
On supported knobs, an orange arc and two endpoint dots show the assigned macro range. Drag an endpoint vertically to edit MIN or MAX directly; use the numbers in Macro Overview for precise edits or overlapping handles. The outer ring is not a second oscillator or an extra macro amount.
Coloured modulation arcs
LFO, envelope and other modulation routes have source-coloured arcs and depth handles around supported knobs. These show modulation excursions, distinct from the macro's two endpoints. Drag a modulation handle to change depth; right-click it for Bypass/Enable, Invert Amount or Remove Assignment. Alt/Option-click a modulation handle inverts its amount. Multiple routes can overlap, so use Modulation Overview when handles are difficult to distinguish.
Main macro knob rings
The eight main macro knobs are different from destination knobs: their value ring and central indicator both reflect the same macro amount. They do not represent MIN and MAX. WHITE RIMS changes the Play-mode appearance, not assignment ranges or sound.
Enable / remove target
Disable a route for comparison or remove it when it is no longer needed.
Several destinations
Each macro supports four target slots. Combine tone, level and FX changes; compensating a brightness boost with a small level reduction can make it easier to perform.
Assignment availability
Not every UI action is a parameter. File operations and descriptive headings are not automatically assignable controls.
See which source moves which destination, and by how much.
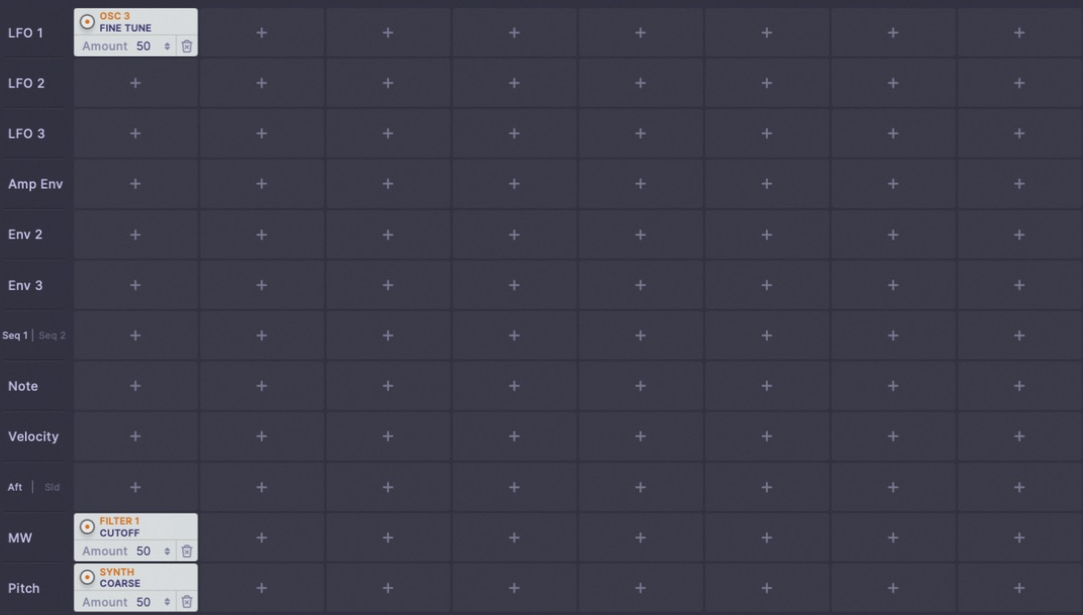
Modulation Overview — source rows and destination assignments · Click to enlarge
01 Sources
LFO / envelope / sequencer
Use repeating, note-triggered or step-based movement. A source must be active and configured appropriately for the route to be audible.
Note / velocity
Use played pitch or note strength to change a parameter.
Aftertouch / mod wheel / pitch bend
Use controller performance data. The controller and DAW must actually transmit the intended messages.
Slide / MPE
Use expressive controller data with compatible MPE configuration. Match Flite's zone and bend range to the controller.
02 Destinations
Assign controls
Use a source's Assign control or the overview's target selector to choose an eligible destination.
Amount
Positive and negative values move a destination in opposite directions relative to its base setting. Large amounts can push a destination against its limits.
Enable
Temporarily bypass an individual route to find what is creating a movement.
Base value
The knob's underlying value remains important. A route near a parameter limit may sound one-sided or barely move.
Macro plus modulation
A macro establishes a performance range; an LFO or other source can add motion. Check combined extremes, not just each assignment in isolation.
Two filters, flexible source routing, and an engine amplitude stage.
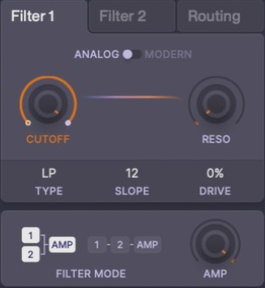
Filter 1 — low-pass controls, filter mode and amp · Click to enlarge
01 Filter controls
Cutoff
Set the frequency region affected by the filter. Its audible role changes with the filter type.
Resonance
Emphasise the region around the cutoff or the selected character's resonance. High settings can produce sharp peaks; lower the level before sweeping.
Drive
Push the filter character harder. Compare at matched loudness so increased level is not mistaken for better tone.
Slope
Choose the available roll-off steepness for the applicable filter type.
Analog / Modern
Select the filter model where available. Special filter types can expose different behaviour from a conventional low-pass model.
02 Types
LP / BP / HP
Low-pass reduces highs, band-pass emphasises a frequency band, and high-pass reduces lows.
COMB
Creates a comb-like frequency response suited to pitched, metallic or flanging-style colour.
FORM
Adds a formant-style spectral character useful for vowel-like movement.
RES
Uses resonator behaviour for a more pitched or resonant character.
BENT
A circuit-bent character combining sample holding, quantisation and nonlinear feedback. Cutoff changes capture rate and smoothing, rather than acting only as a conventional cutoff. The model changes its starvation/glitch character; start at restrained resonance and drive.
03 Routing and amp
Source routing — Filter 1, Filter 2 and direct amp paths · Click to enlarge
Routing tab
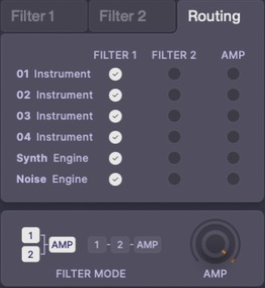
Choose whether each sample slot, synth and noise source feeds Filter 1, Filter 2 or the unfiltered path.
Parallel: 1 + 2 → AMP
Combine the two filters' outputs. A source routed only to one filter will not automatically pass through the other.
Serial: 1 → 2 → AMP
Feed Filter 1's output into Filter 2. Sources routed directly to Filter 2 join at that stage.
Bypass path
A source that bypasses the filters can stay bright even when both filter cutoffs are low.
Amp
Set the amplitude stage's level. Check it along with source levels and effect output controls when a patch clips.
TRY IT IN FLITE
Keep a transient while filtering a body layer
Route a sustained layer into Filter 1.
Route a short transient layer to the bypass path.
Low-pass the body without removing the separate transient.
Balance both layers at the source, then check overall amplitude.
Three reorderable slots, engine assignment and wet/dry mixing.
01 Slot controls
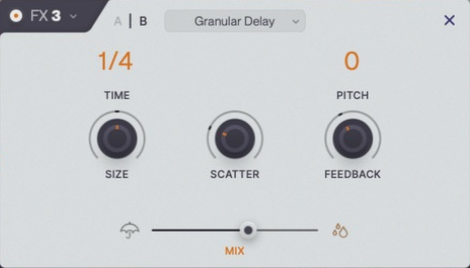
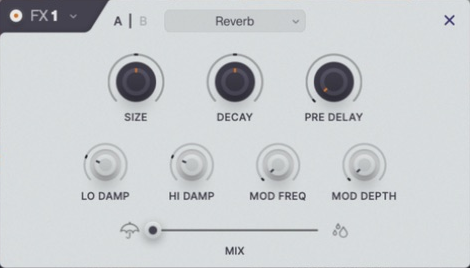
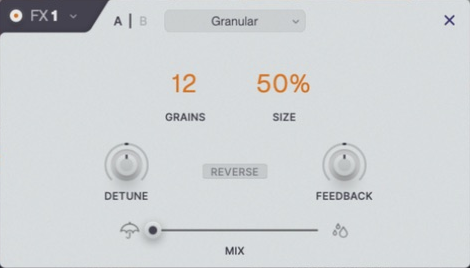
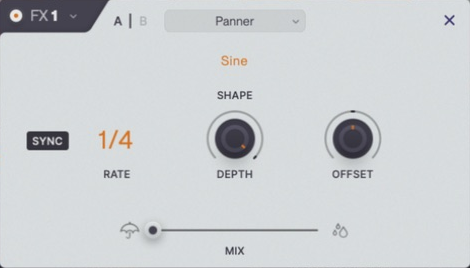
Effect dropdown
Choose from the alphabetised effect menu. Display order is separate from stored effect IDs; alphabetisation does not renumber older preset selections.
Settings icon
Open the selected effect's detailed popup. Close the popup to return to the dashboard.
Power
Bypass the slot for comparison without treating it as a deletion of the effect settings.
Mix
Balance dry and effected audio. At a low Mix, even a strong effect setting can sound subtle.
A / B
Choose which engine the slot processes. A slot on engine B will not affect a source that is only playing through engine A.
Slot order
On the main Create panel, click-drag an FX slot’s background/title area onto another FX slot and release when the destination highlights. Avoid dragging MIX or another control, which retains its normal function. Reordering changes processing order: distortion into reverb sounds different from reverb into distortion. The FX 1/2/3 selector inside a popup only changes which slot you are viewing; it does not reorder effects.
Compressor, Bit Crusher, Distortion and Lo-fi controls.
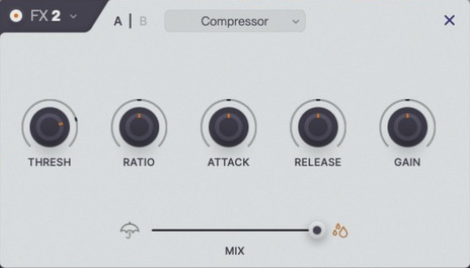
01 Compressor
Compressor — threshold, ratio, attack, release, gain and mix · Click to enlarge
Threshold · −60 to 0 dB
Set the level above which compression acts. Lowering the threshold generally applies compression to more of the signal.
Ratio · 1:1 to 20:1
Set how strongly levels above the threshold are reduced. At 1:1 there is no compression ratio effect.
Attack · 0.1–100 ms
Set how quickly gain reduction responds. Slower attacks let more transient energy through.
Release · 10–1000 ms
Set how quickly compression recovers. Match it to the phrase to avoid unwanted pumping.
Gain · −24 to +24 dB
Apply manual makeup/output gain. Compare with bypass at similar loudness.
Slot Mix
Blend the compressed and dry signal for parallel compression. This compressor is not the mod sequencer's Sidechain pattern and does not expose a separate external sidechain input.
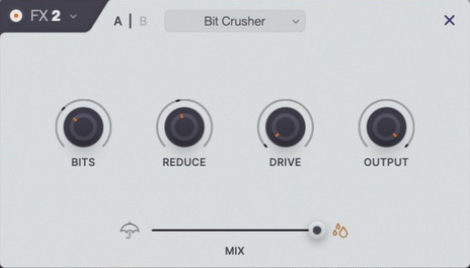
02 Bit Crusher
Bit Crusher — bits, reduction, drive, output and mix · Click to enlarge
First knob · 2.0–24.0
Set bit depth; the value display is numerical without a 'bits' suffix. Lower values increase amplitude quantisation.
Reduction · 1×–64×
Increase the sample-rate reduction factor for stepped, aliased texture.
Drive · 0–10 dB
Increase level into the crushing stage. It can intensify the effect.
Output · −24 to 0 dB
Reduce output to compensate for added drive. Keep peaks under control when comparing settings.
03 Distortion
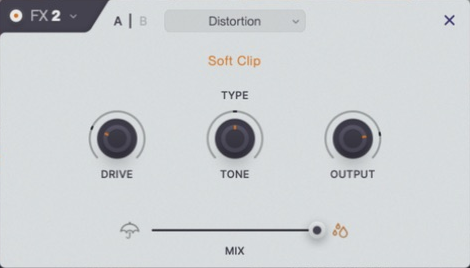
Distortion — Soft Clip type, drive, tone, output and mix · Click to enlarge
Type
Choose the available distortion character.
Drive
Increase the amount of saturation/distortion.
Tone
Shape the brightness of the distorted sound.
Output
Compensate for the level increase so the patch remains balanced.
04 Lo-fi
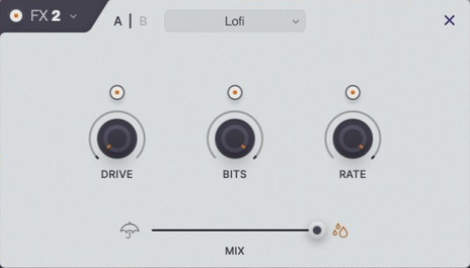
Lo-fi — drive, bits and rate with individual enable switches and mix · Click to enlarge
Drive and enable
Add the drive stage, or bypass that stage independently.
Bit depth and enable
Reduce amplitude resolution independently of the other Lo-fi stages.
Rate and enable
Reduce sampling resolution for a rougher digital texture. This is distinct from the separate Bit Crusher's reduction-factor control.
Slot Mix
Blend the degraded sound with the original for subtler texture.
TRY IT IN FLITE
Add grit without a level jump
Choose Bit Crusher and start with no Drive.
Lower bit depth and raise Reduction until the texture is obvious.
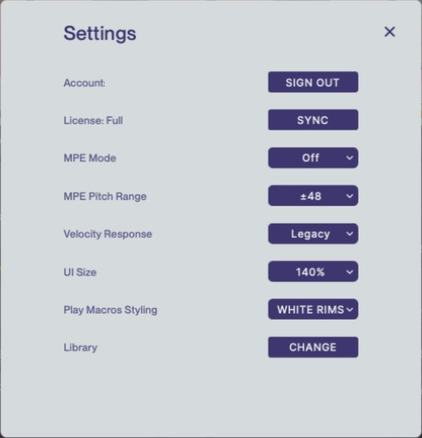
Manage authorisation, expression, display and library location.
Settings · Click to enlarge · Personal information redacted
01 Account and library
Sign In / Sign Out
The available account action follows your sign-in state. Use the same account that owns the intended licence.
Sync
Refresh account/licence content after purchases or changes. A connection failure is not proof that your password is wrong.
Library → Change
Choose the content location. Keep it on an available, writable drive; moving the location does not magically repair missing source files.
Account help
If a guest purchase used a different email, check the licence email on the purchase confirmation before trying another password.
02 Performance preferences
MPE Mode
MPE allows separate expression for individual notes by placing them on different MIDI channels. Off disables Flite's additional MPE member-channel pitch handling. Lower uses channel 1 as the master with member channels 2–16; Upper uses channel 16 as master with member channels 1–15. Match the zone used by your controller and make sure the DAW preserves the separate channels.
MPE Pitch Range
Choose ±12, ±24, ±48 or ±96 semitones for member-channel pitch bend; the fresh setting is ±48. The controller and Flite must use the same range. For example, a controller sending bends for ±48 will play the wrong intervals if Flite is set to ±12. This is not the range of notes a source can play.
Velocity Response
Choose the curve applied to the Velocity modulation source. This is not a MIDI velocity-layer remapper or a master loudness control: the audible result depends on the assigned destination and its modulation amount. Dedicated velocity-sensitive controls can have their own response.
Options in this dropdown:
Legacy — Pass velocity through unchanged. A half-strength note supplies approximately 50% modulation-source value, preserving the original response.
Soft — Lift low and middle velocities with a square-root curve. A half-strength note supplies about 71%, making stronger modulation easier to reach with a lighter touch. With a negative assignment, that stronger response moves the destination down rather than up.
Punch — Reduce low and middle velocities with a squared curve. A half-strength note supplies about 25%, leaving more contrast between gentle notes and hard hits.
S-Curve — Use a smooth curve that reduces values below halfway and raises values above halfway, while keeping halfway at 50%. It flattens the response near the extremes and increases contrast around the middle.
Pressure and Slide
Assign Aftertouch/pressure and Slide to destinations such as cutoff or colour in Modulation Overview. Slide uses CC74. Enabling MPE does not automatically choose a timbral destination for these gestures.
MPE setup check
Enable MPE output on the controller and the DAW track, select the matching Lower or Upper zone in Flite, and match the pitch range. Hold two notes and bend one: only that note should bend. Then assign pressure or Slide to an obvious destination and test each gesture separately. If every note moves together, check that the host is not merging MIDI channels.
03 Appearance
UI Size
Choose 80% through 150% in 10% steps. This affects interface dimensions, not sound quality.
Play Macros Styling
Choose DEFAULT or WHITE RIMS. White Rims is the fresh-install default.
Debug CPU display
Some development builds include a CPU readout. It is not a standard release-build feature and is not directly equivalent to the DAW's CPU meter.
A short diagnostic path before changing the sound or reinstalling.
01 No sound or unexpected sound
No MIDI activity
Check the DAW track input, monitoring, channel and whether notes reach the plugin.
MIDI but no sound
Check source mutes/levels, key and velocity zones, engine A/B, sequencer state, sample availability, envelope sustain, filters and output.
Sequence will not stop
Check global Hold, sustained input notes and MIDI sustain. Long envelope releases and effect tails can sound after notes stop.
Parameter moves by itself
Check macros and Modulation Overview. Disable routes one at a time to isolate the source.
Clicks
Check sample/loop boundaries, short attack/release times, discontinuous modulation and clipping before attributing every click to CPU.
02 Performance and files
High CPU
Compare at the same sample rate, buffer size, voice count and patch. Reduce unison, grain overlap, long releases and heavy effect combinations one at a time. A DAW's realtime meter is not a universal whole-computer CPU percentage.
Missing sounds
Verify the library location, installed packs and original user files. Restore from backup rather than deleting and resaving blindly.
API generation fails
Check connection, key permissions, credits and provider availability. Do not paste your API key into a support message.
Old projects
Open a copy first after updating. Flite 2.1 preserves the established plugin identity and legacy parameter mappings, but required external audio must still exist.
Support information
Send Flite version, operating system, DAW/version, plugin format, sample rate, buffer size and reproducible steps. Include the smallest shareable example; omit passwords and API keys.
03 Terms used in this manual
Preset / instrument / sample
A preset is the complete Flite sound; an instrument defines a source's playback and mapping; a sample is audio material.
Root / key range
Root is the sample's pitch reference. Key range decides which notes trigger it.
Voice / grain
A voice is a sounding note instance; a grain is a short audio fragment inside granular playback.
Macro / modulation
A macro is a performance control for assigned ranges. Modulation is parameter movement driven by a source such as an LFO, envelope or controller.
Mix / output
Mix balances dry and wet audio. Output changes the level leaving a stage.
Rate / duration
Rate says how often something repeats; duration says how long an event or segment lasts.
 wavea
wavea